


Finger-Manipulated Weaves-Part 5
Today marks the end of my five-part series on finger-manipulated weaving techniques. In the first post, I discussed the general attributes of these weaves and explained the methods of leno and Mexican lace. The following post covered Spanish lace; the third post was about Brooks Bouquet. Lastly, the previous post focused on Danish Medallions.
Today, I will explain how I combined different techniques to create a wall hanging.
Yarn
In the previous posts, the examples were made mainly using cotton. However, I opted for Euroflax 14/2 linen (630 yd/110 gm) for the wall hanging. I wanted to add a subtle design using more than one color and avoid stripes of color in either the warp or weft. Therefore, I chose aqua for the warp and cream for the weft. This decision was perfect as it resulted in a 3-color design, with pure aqua and pure cream in the lace areas and a tinted aqua created by the interlacement of the aqua warp and cream weft in the plain weave areas.
Design
I found a lovely draft on Handweaving.net. It is draft # 49914, attributed to Figure 107, Handgeziechnete Webereibücher aus Tirol, Franz Donat, Germany, 1914. The design is a 12-shaft, point twill threading with a fairly complicated tie-up and treadling sequence. However, I chose to use it in a way similar to a profile draft.
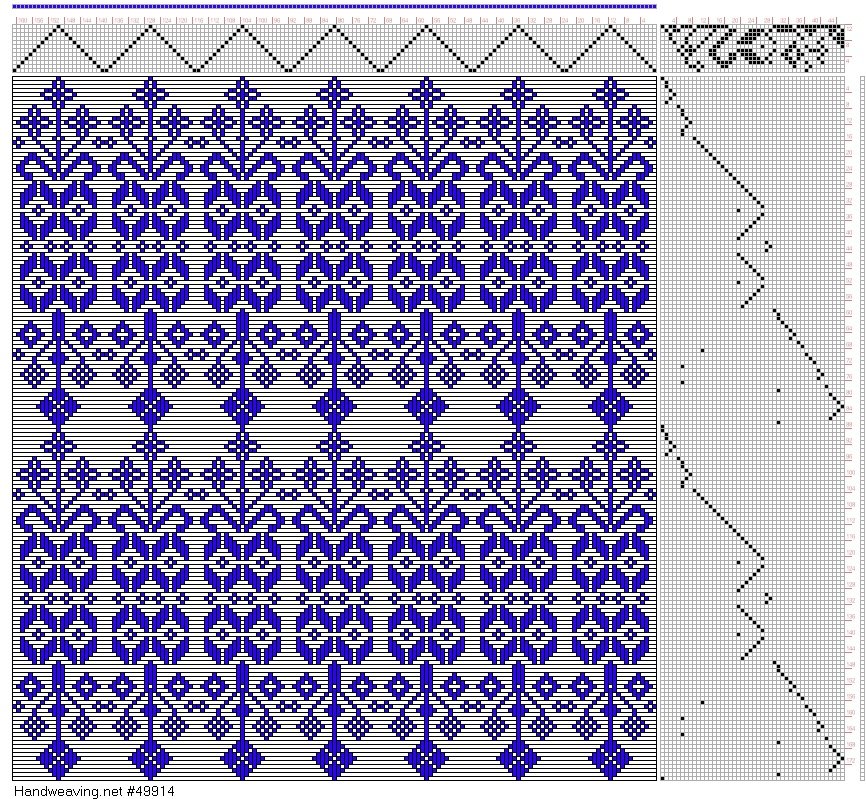
I decided to create a design using a single motif. I wanted the piece to be 12 inches wide and chose 14/2 linen for the warp, with a sett of 15 ends per inch (epi) . This resulted in 180 warp ends, which are divisible by multiples of 2's, 3's, 4's, 5's, 6's, 8's, and 10's, making it perfect for the various finger-manipulated lace techniques. I used weaving software to add threads to the original draft to achieve the desired 180 warp ends.

I adjusted the woven design to avoid elongation caused by the lace techniques. So, I shortened the draft and came up with my final "profile" draft, which you can find below. The numbered sections in the draft correspond with the technique descriptions that follow. Although I had a general idea of what I wanted to weave, I made some changes to the original design while at the loom. I added plain weave rows when I thought they would serve a decorative purpose or provide structural support.

Section 1 - Spanish Lace and Leno
Three rows of Spanish lace were woven to create a border, which was filled in between with leno to form the pattern. The center of the design was made using 2/2 leno, while 1/1 leno was used for most of the motif.
The two photos below show the weaving process on the loom, which is why the design appears upside down.

The central motif has two-thread Brook’s bouquets above it, while the other two have three-thread bouquets above them.
Section 2 - Spanish Lace and Mexican Lace
In this section, you will find three rows of Spanish lace acting as a border. The fill-in between is 2/2 Mexican lace. To add an asymmetrical element, the left side features two crosses while the right side maintains the diamond shape as seen in the original "profile." You can see this element more clearly in the photograph of the full hanging displayed at the bottom of this post.

Section 3 - Brook’s Bouquet
The following two sections use two variations of Brook’s Bouquet. Here, the 4-thread bundles are staggered. This section’s lacier effect is achieved by not weaving any Spanish lace fill.

Section 4 - Brook’s Bouquet Spots
This pattern is comprised of a sequence that begins with a single row of bouquets, followed by three rows of plain weave, then two rows of bouquets, three more rows of plain weave, another two rows of bouquets, three additional rows of plain weave, and finally, one last row of bouquets. The bouquets themselves consist of three threads and are tightly beaten.

Section 5 - Danish Medallion
This motif is my favorite of the hanging. The Danish Medallions are outlined with doubled cream linen and filled with single cream linen for six rows of tabby.

Finishing
I wove 3 inches of plain weave at the top selvedge. After taking it off the loom, I folded the edge under 1/4 inch, doubled it, and stitched it by hand to create a casing.
The selvedge at the bottom was finished with a double Damascus knotted edge. I trimmed the fringe to 8 inches.
The final step was to press the backside of the garment with steam on the linen setting of the iron.

HANGING
I bought a tapestry frame for rugs. Another way to hang it is by placing a wooden dowel inside the hemmed casing.

Finished Dimensions: 11” x 25” + 8” fringe

I hope you have enjoyed this series!


